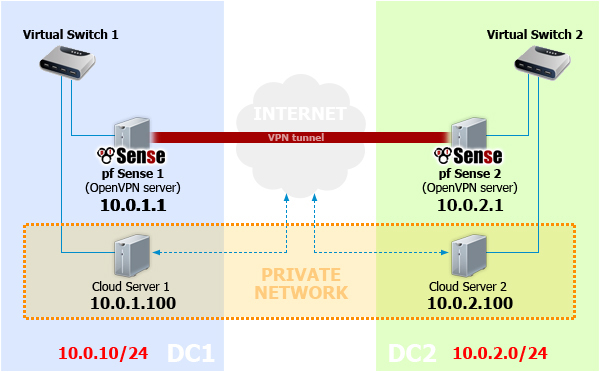
In this second part, specific for those with Linux servers, we proceed with the configuration of the Cloud Servers in the two data centers so they can reach one another through the private OpenVPN tunnel that has been established.
The pre-requirements for this guide are the same as the
first part, ed and in particular you need to connect a network adapter of the Cloud Server through a Virtual Switch to the pfSense router/firewall.
To allow the "server1" to reach the "server2" first of all you need to connect the "server1" with the "pfsense1" through a private IP address (in the example we will use 10.0.1.100), assigned to the second network adapter. The "server1" and "server2", object of this guide, can continue to have their public IP address, through which to communicate directly to and from the Internet. The traffic addressed to the other server will travel through the private OpenVPN tunnel established between "pfsense1" and "pfsense2".
To avoid problems in case of error while following these instructions, persistent problems such as to block the Cloud Servers, in this guide we will configure the private IP address, the routing and the iptables firewall rules TEMPORARILY.
This means that the configurations will only last until the server (or the relevant network interfaces) is rebooted. In case of failures simply reboot "server1" and/or "server2" to restore the previous configuration. However, it is possible to simply make these changes permanent, by following the instructions of the specific Linux distribution in use in each Cloud Server.
Here is a diagram of the network we are creating:

- 1 - Configure "server1"
- 1.1 - connect to your Linux Cloud Server via SSH using the "root" user
- 1.2 - to assign the private IP address type in the following command:
ifconfig eth1 10.0.1.100/24
- 1.3 - to configure the routing type in the following command:
ip route add 10.0.2.0/24 via 10.0.1.1
- 1.4 - to allow all the traffic through the network adapter connected to the pfSense router/firewall type in the following command:
iptables -I INPUT -i eth1 -j ACCEPT
- 2 - Configure "server2"
- 2.1 - connect to your Linux Cloud Server via SSH using the "root" user
- 2.2 - to assign the private IP address type in the following command:
ifconfig eth1 10.0.2.100/24
- 2.3 - to configure the routing type in the following command:
ip route add 10.0.1.0/24 via 10.0.2.1
- 2.4 - to allow all the traffic through the network adapter connected to the pfSense router/firewall type in the following command:
iptables -I INPUT -i eth1 -j ACCEPT
- After checking that the servers work correctly, if you wish to make the private IP addresses, assigned in steps 1.2 and 2.2, permanent (therefore persistent after rebooting), it is possible to follow the instructions found in the Virtual Switch and private network guides.
- 3 - Check connection
- 3.1 from "server1"
- 3.1.1 - type in the following command:
ping 10.0.2.1
- 3.1.2 - make sure you get a response from "pfsense2"
- 3.1.3 - type in the following command:
ping 10.0.2.100
- 3.1.4 - make sure you get a response from "server2"
- 3.2 and also from "server2"
- 3.2.1 - type in the following command:
ping 10.0.1.1
- 3.2.2 - make sure you get a response from "pfsense1"
- 3.2.3 - type in the following command:
ping 10.0.1.100
- 3.2.4 - make sure you get a response from "server1"
At this point we have checked that the connection between "server1" and "server2" has been established. The two servers can now reach one another through the private IP addresses 10.0.1.100 and 10.0.2.100. All the network services (web, database, file sharing, etc.) offered by "server1" will be available from "server2" and vice versa. To this private network you can add other servers ("server3", "server4", etc.) simply by changing the steps above as follows:
- by replacing the IP address 10.0.1.100 with the following IP addresses (10.0.1.101, .102, .103, ...) if the server is found in data center 1
- if the server is found in data center 2, by replacing the IP address 10.0.2.100 with the following IP addresses (10.0.2.101, .102, .103, ...)