In this guide we explain how to create a private network which connects two or more Cloud Servers found in two different data centers, creating a VPN tunnel between two Routers/Firewalls, one in each data center. For a Router/Firewall we shall use a Cloud Server based on
pfSense, one of the templates available with Aruba Cloud Computing.
Here is a diagram of the network structure we will end up with after completing this guide:
Therefore after completing the process "server1" found in "data center 1" will be connected to "server2" in "data center 2", the exchange of data will take place through a protected tunnel, and the two servers will be able to communicate using the private IP address which will be assigned to each server.
More specifically the data which from "server1" travels to "server2" is encrypted by "pfsense1" and decrypted by "pfsense2", this way even if the data passes through a network which is not safe (the Internet) no one will be able to decrypt it.
Also, however complex the path of the data is through the Internet between "data center 1"and "data center 2", "server1" and "server2" will be able to communicate separated by just 2 "hops" ("pfsense1" and "pfsense2").
This guide has some pre-requirements and is divided in 4 parts:
- the first part being this guide, which shows how to establish the protected tunnel
- a part which describes the required steps should you wish to connect Windows servers ("server1" and/or "server2" have Windows operating system)
- a part which describes the required steps should you wish to connect Linux servers ("server1" and/or "server2" have Linux operating system)
- an addendum for those who need to connect 3 or more Cloud Servers divided in 3 or more different data centers, using multiple point-to-point connections between the various data centers (a type of MESH network)
These are the pre-requirements:
- have two Cloud Servers in two different data centers to connect with each other, which in this guide we will indicate as "server1" and "server2"
- have two virtual switches, one in each data center "virtual switch 1" and "virtual switch 2"
- have two Cloud Servers based on pfSense, below indicated as "pfsense1" and "pfsense2"
- have connected "server1" and "pfsense1" through the "virtual switch 1"
- have connected "server2" and "pfsense2" through the "virtual switch 2"
In detail, the steps (and relevant guides) required to complete the above pre-requirements are:
- In data center 1:
- create a pfSense cloud server "pfsense1"
- create a virtual switch "virtual switch 1"
- connect the second network adapter of "pfsense1" to "virtual switch 1"
- connect the second network adapter of "server1" to "virtual switch 1"
- In data center 2:
- create a pfSense cloud server "pfsense2"
- create a virtual switch "virtual switch 2"
- connect the second network adapter of "pfsense2" to "virtual switch 2"
- connect the second network adapter of "server2" to "virtual switch 2"
- 1 - Configuration of the 2 pfSense Routers/Firewalls
- 1.1 To complete the following steps you need to know the public IP addresses of the 2 pfSense Cloud Servers ("pfsense1" and "pfsense2"), assigned during creation.
pfSense can be configured through the web interface, by connecting to the web admin interface using your browser.
If, for example, when creating the pfSense Cloud Server you assigned the IP address "95.110.156.254" you can:
- 1.1.1 open your browser by connecting to this address https://95.110.156.254
- 1.1.2 enter your login details: enter "admin" in the "Username" field and the password you selected when creating the Cloud Server.

- 2 - "pfsense1" configuration
- 2.1 Assign an IP address to the second network adapter of "pfsense1" (in our example we will use this private IP address 10.0.1.1)
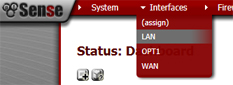
- 2.1.1 from the menu at the top select "Interfaces", then "LAN"
- 2.1.2 in this page you simply need to edit in "Static IP configuration" the IP Address field and enter the value "10.0.1.1", then select "/24" from the menu next to it, and once completed click on "Save" at the bottom of the page

- 3 - Configure pfSense as an OpenVPN server
- 3.1 in the pfSense web admin interface select "VPN" then "OpenVPN" from the menu at the top

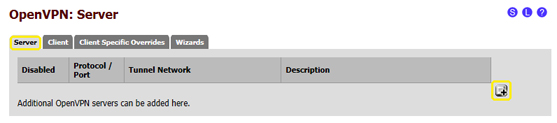
- 3.2 in the "Server" details page click on the "+" symbol in the bottom right corner, as shown in the image below:
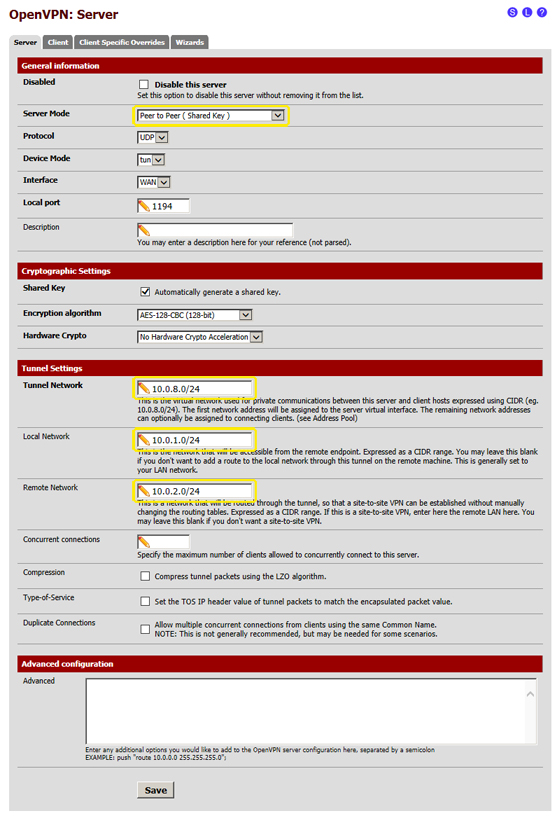
- 3.3 in this page, some of the default settings need to be changed with the following:
- 3.3.1 Server Mode: select "Peer to Peer (Shared Key)"
- 3.3.2 Tunnel Network: enter "10.0.8.0/24"
- 3.3.3 Local Network: enter "10.0.1.0/24"
- 3.3.4 Remote Network: enter "10.0.2.0/24"
- 3.4 the other values can be left empty or with the default settings
- 3.5 after changing these details the page must look like the one in the following image:
- 3.6 click on "Save" at the bottom of the page
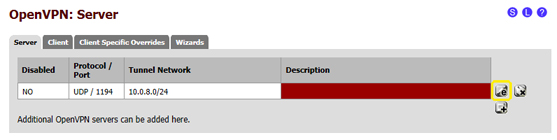
- 3.7 now you need to copy the "Shared Key" which was generated automatically during the previous step: click on the "e" (edit) symbol in the bottom right corner, to go back to the previously created edit page of the OpenVPN connection, as shown in the image below:
- 3.8 Go to the "Shared Key" text box, select all the content, then right-click it and select "Copy" from the dropdown menu, as shown in the image:
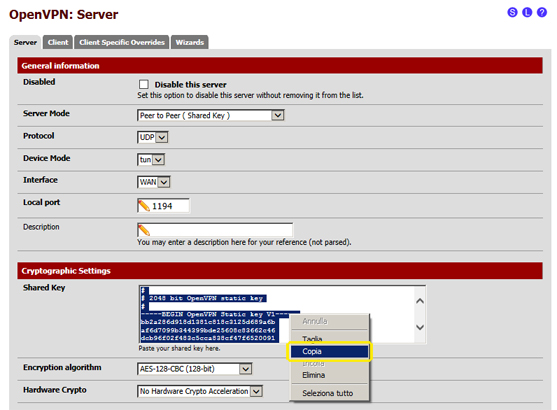
- 3.9 Save the copied text in a file. This text represents the authentication key which will be used during the configuration of OpenVPN in "pfsense2" so that it can log in when connecting to "pfsense1".
- 4 - Configure the firewall
- 4.1 Configure the firewall for the WAN interface
- 4.1.1 In the pfSense web admin interface select "Firewall" from the menu at the top, then "Rules"
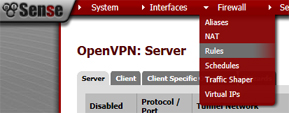
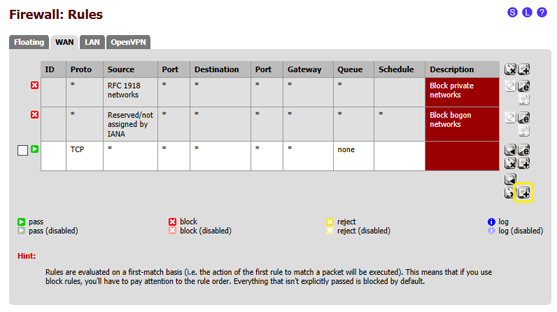
- 4.1.2 in the "WAN" page click on the "+" symbol in the bottom right corner, as shown in the image below:
- 4.1.3 in this page, some of the default settings need to be changed with the following:
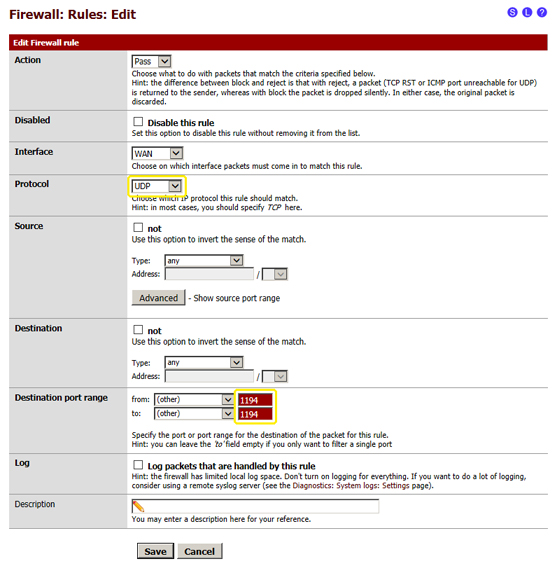
- 4.1.3.1 Protocol: select "UDP"
- 4.1.3.2 Destination port range: enter the value "1194" in the "from:" and "to:" field
- 4.1.4 after changing these details the page must look like the one in the following image:
- 4.1.5 click on "Save" at the bottom of the page
- 4.2 Configure the firewall for the "OpenVPN" interface
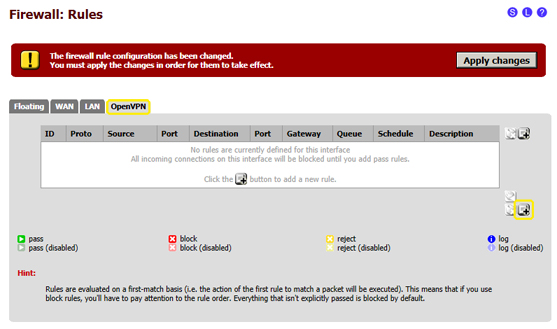
- 4.2.1 In the pfSense web admin interface select "Firewall" from the menu at the top, then "Rules"
- 4.2.2 click on the OpenVPN tab, then click on the "+" symbol in the right bottom corner, as shown in the image here below:
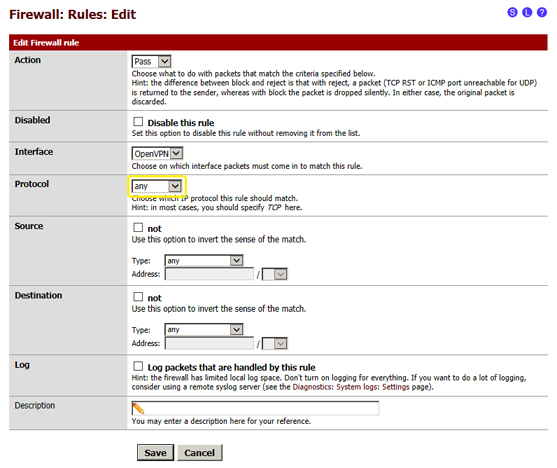
- 4.2.3 in this page, some of the default settings need to be changed with the following:
- 4.2.3.1 Protocol: select "any"
- 4.2.4 after changing these details the page must look like the one in the following image:
- 4.2.5 click on "Save" at the bottom of the page
- 4.3 Apply the changes to the firewall rules
- 4.3.1 After completing the previous step you will reach a page with a list of firewall rules, in the top right corner click on "Apply changes"
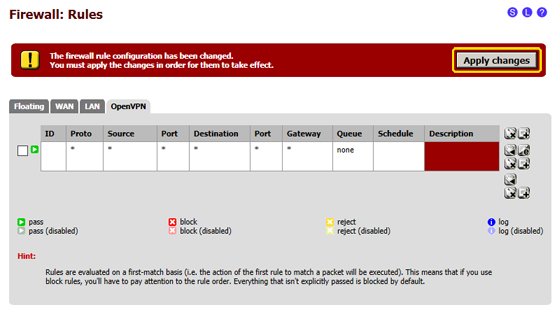
- 4.3.2 the firewall configuration in pfSense has been completed.
- 5 - "pfsense2" configuration
- 5.1 Connect to the "pfsense" web admin interface as indicated in step 1
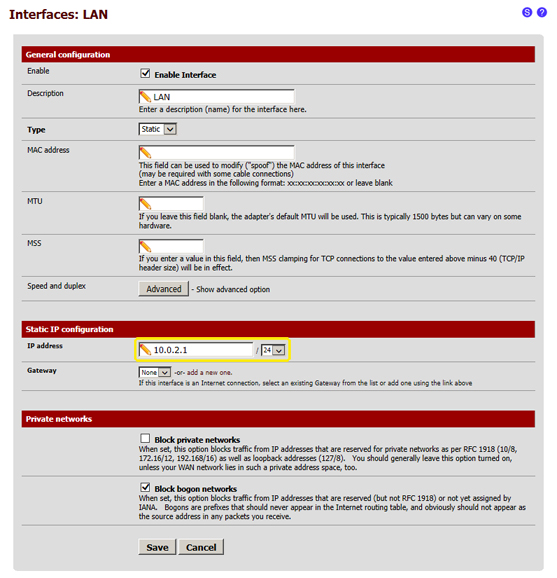
- 6 - Assign an IP address to the second network adapter of "pfsense2" (in the example we will use this private IP address 10.0.2.1)
- 6.1 from the menu at the top select "Interfaces", then "LAN"
- 6.2 in this page simply edit the IP Address field in the "Static IP configuration" section and enter this value "10.0.2.1", then select "/24" in the menu on the right, and then click on "Save" at the bottom of the page
- 7 - Configure pfSense as an OpenVPN client
- 7.1 in the pfSense web admin interface select "VPN" in the menu at the top, then "OpenVPN"
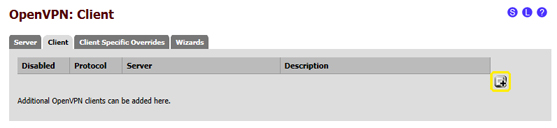
- 7.2 select the "Client" tab, then click on the "+" symbol in the right bottom corner, as shown in the image below:
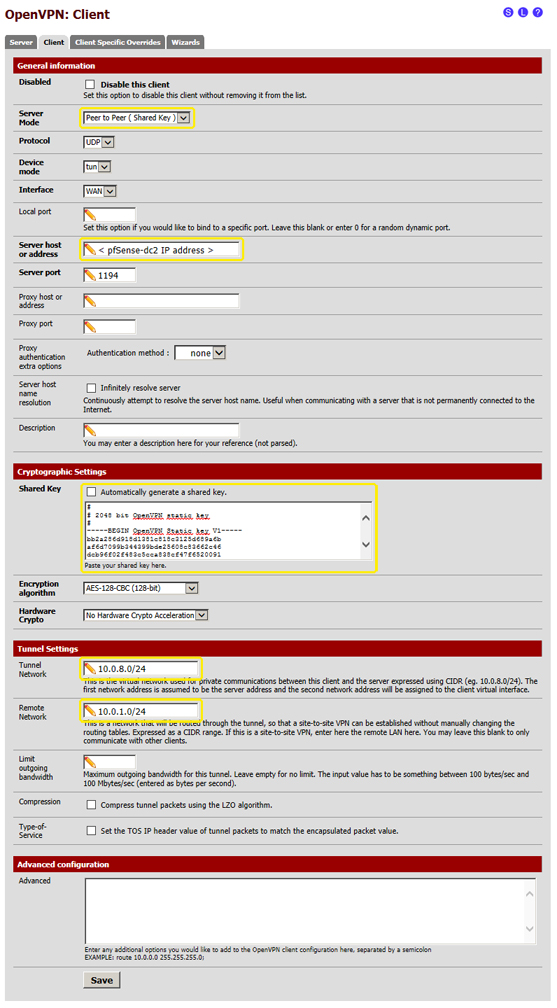
- 7.2.1 Server Mode: select "Peer to Peer (Shared Key)"
- 7.2.2 Server host or address: enter the public IP address of "psfense1"
- 7.2.3 Shared Key: deselect "Automatically generate a shared key", then in the text box paste the "pfsense1" Shared Key which we saved during the "pfsense1" configuration process (step 3.8 and 3.9)
- 7.2.4 Tunnel Network: enter "10.0.8.0/24"
- 7.2.5 Remote Network: enter "10.0.1.0/24"
- 7.3 the other values can be left empty or with the default settings
- 7.4 after changing these details the page must look like the one in the following image (except for the "Server host or address" field):
- 7.5 click on "Save" at the bottom of the page
- 8 - Configure the firewall
- 8.1 Repeat all the steps of the previous step 4 (4.1, 4.2, 4.3), this time in Cloud Server "pfsense2"
- 9 - Configure the firewall
- 9.1 Verify the connection between "pfsense1" and "pfsense2"
- 9.2 in the pfSense web admin interface select "Status" from the menu at the top, then "OpenVPN"
- 9.3 in "pfsense1" (OpenVPN server) the "Status" must be "up", and the page must be similar to this one:
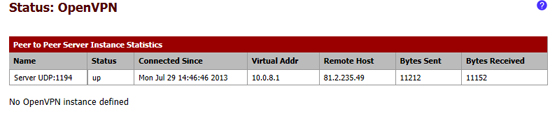
- 9.4 in "pfsense2" (OpenVPN client) the "Status" must be "up", and the page must be similar to this one:

- 9.5 If the connection has been established it is possible to start configuring the servers of the virtual network, "server1" and "server2", if it hasn't you need to check all the previous steps starting from step 2.