Partner > 3 - Partner Panel > How to customize the Services

3.2 How to customize the Services

 ATTENTION: we remind you that in order to complete the customization of the Control Panel you need to indicate a domain name in the provided "Control Panel URL" section. A failure to do so would result in losing the new settings of the Control Panel customization.
Upon initial login, or in any case before you begin selling, it’s important to customize your Control Panel, as it will be displayed and used by your customers.

To customize the Control Panel proceed as follows:
  • log in the "Partner Control Panel"
  • go to the "Customize" section

  • select the "Services" option from the "Customization" menu on the left

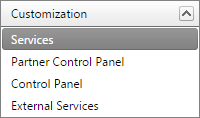
From this section you can:
  • Control Panel: select the URLs for the Control Panel and for resetting the password
  • Manage Services: select which services to enable for your customers

Control Panel (indicate the URLs)


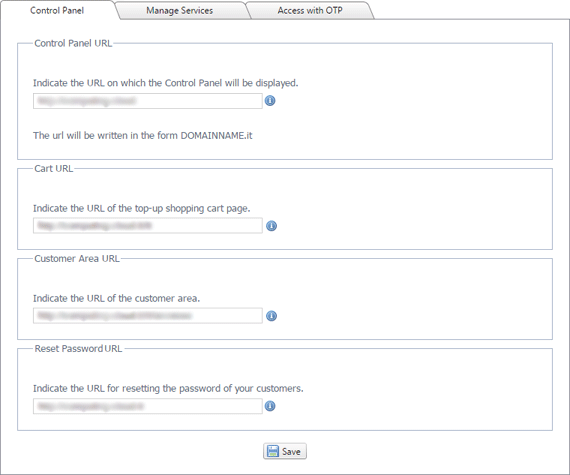
From this page you can configure and customize the following addresses:
  • Control Panel URL
    in the "Control Panel URL" field you MUST indicate the URL where the Control Panel will be displayed. This is important and essential as your customers will be logging in to the Control Panel from this address. Furthermore, both the data and the hosts related to the FTP space managed by your Users, and also the host for the VPN access, will display the address made up by the indicated URL.
    We recommend that in the URL field you enter the domain name of the reselling website (for example "companyname.it"): the Control Panel for data center DC1 will therefore be available at http://admin.dc1.companyname.it  (or http://admin.dc2.companyname.it  if you choose to use data center DC2).
    To get the URL working, after saving, you need to manage the DNS for your domain, by adding a record:
    admin.dc1.companyname.it  in CName to admin.dc1.computing.cloud.it
    admin.dc2.companyname.it  in CName to admin.dc2.computing.cloud.it
    admin.dc3.companyname.it  in CName to admin.dc3.computing.cloud.it
    admin.dc4.companyname.it  in CName to admin.dc4.computing.cloud.it
    admin.dc5.companyname.it  in CName to admin.dc5.computing.cloud.it
    admin.dc6.companyname.it  in CName to admin.dc6.computing.cloud.it
    admin.dc7.companyname.it  in CName to admin.dc7.computing.cloud.it
    admin.dc8.companyname.it  in CName to admin.dc8.computing.cloud.it
    admin.services.companyname.com in CName to admin.services.cloud.it
    After completing the above steps, and updating the DNS, when you go to  http://admin.dc1.companyname.it  you will be automatically redirected to the Control Panel of data center DC1. Should you choose to use multiple data centers, these steps will need to be repeated for each  address of each data center.
    The selected URL will make up the sender of the communications sent by the system (when a new User is created or the Password is Reset).
    If, for example, you chose the URL admin.dc1.companyname.it, the sender of the emails sent by the  system will be no-reply@admin.dc1.companyname.it.
    This sender can only be changed in the part related to "Control Panel URL", therefore the no-reply@ part cannot be changed.
    Questo mittente è modificabile solo nella parte relativa ad "URL Pannello Tecnico", quindi il no-reply@ non può essere cambiato.
  • Cart URL
    Partners can indicate an address to their customers where they can top-up their credit. If configured, the user's Control Panel will include a TOP-UP button which will go directly to this address.
  • Costumer Area URL
    By configuring this address Partners allow users to check their personal information.
  • Reset Password URL
    In the "Reset Password URL" field you can indicate the address of the web page towards which the Users will be redirected when they wish to change their password or if they lose their password. We recommend that the Partner displays a page with contact details at such address for customers who wish to Reset their Password, or display a form to allow customers to submit requests. Partners can reset the password for Users simply by following the process for Resetting the Password of Users from their Partner Control Panel.
Once all the required changes have been completed you need to click on "Save"


to activate them. Once the changes have been completed, a message like the following will appear to confirm the operation:

Manage Services (enable the services)
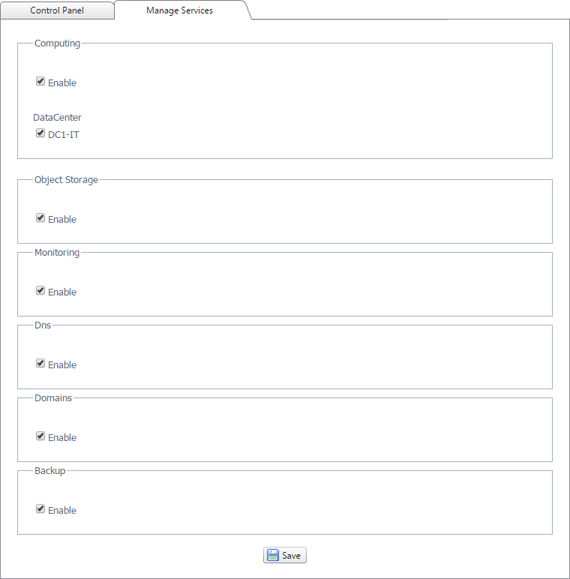


In the "Manage Services" page it is possible to enable one or more services for your customers. For the Computing service it is possible to specify also the data centers. We remind you that to each data center corresponds a different URL address for the Control Panel as indicated at the beginning of this guide. It will not be possible to disable a data center on which at least one service is provided for customers of  Partners.

Once all the required changes have been completed you need to click on "Save"


to activate them. A message like the following will appear to confirm the operation: