When you create a Cloud Server
you will be prompted to choose an access password for the administrative user of the Cloud Server (
administrator user for Windows operating systems and a
root user for Linux operating systems). We have also emphasised the need to note this password because it cannot be changed after creation and cannot be recovered in any way. Being the password chosen by the user and saved in the Cloud Server created, it is not known, nor can it be recovered, by the Aruba Cloud Computing support service. If you lose the access password there is a risk of never being able to access the data contained in the Cloud Server, or even making the actual Cloud Server completely unusable.
However, depending on the operating system selected, there are certain rules to force the operating system to reset the password for the administrator user:
To reset the password in the case of Cloud Servers with a Windows Server 2008/2012/2016 operating system you first have to
upload an image of a virtual CD and
connect it to the virtual CD/DVD disk. Then you will need to
connect to the Cloud Server using the Recovery Console and simultaneously keep the Visual Cloud application open and follow the instructions as below.
- Download the image of the virtual CD cd140201.iso required to boot from the Server Cloud from CD
- Upload the image to the FTP area made available for your account
- Connect the image to the virtual CD/DVD player for the Cloud Server whose password you want to reset
- Switch off the Cloud Server by using the "Shutdown Cloud Server from operating system" option.
- For Hyper-V:
- Start the Cloud Server which will automatically boot up from the CD
- For VMware if you wish to permanently change the boot order of the Cloud Server BIOS to boot up from a CD each time there's a boot CD, when rebooting proceed as follows:
- Connect to the Cloud Server via VMware vSphere Client and open the Console.
- Start up the Cloud Server and before the Cloud Server loads the operating system quickly press "F2" to access the BIOS of the Cloud Server. To complete this operation successfully you need to be very quick as the amount of time available to press F2 before the Cloud Server boots up from the disk is very little. You can try again several times using the "Send Ctrl-Alt-del" command found in the VM Menu -> Guest of the Mware vSphere Client console, otherwise repeat the operation from step 4.
- Go to the Boot section of the BIOS and change the boot order, in order to give priority to the boot from CD/DVD and not to the HDD disk containing the operating system. Save the configurations of the BIOS and reboot.
- If the Cloud Server does not boot from the CD but directly loads the operating system, repeat the operation from step 4.
- For VMware if you wish to boot only once from the CD using the Boot menu of the Cloud Server proceed as follows:
- Connect to the Cloud Server via VMware vSphere Client and open the Console.
- Start up the Cloud Server and before the Cloud Server loads the operating system quickly press "ESC" to display the Boot menu. To complete this operation successfully you need to be very quick as the amount of time available to press "ESC" before the Cloud Server boots up from the disk is very little. You can try again several times using the "Send Ctrl-Alt-del" command found in the VM Menu -> Guest of the VMware vSphere Client console, otherwise repeat the operation from step 4.
- Select "CD-Rom Drive" from the boot menu and press enter.
- If the Cloud Server does not boot from the CD but directly loads the operating system, repeat the operation from step 4.
- When booting from the virtual CD you will get a screen like below.
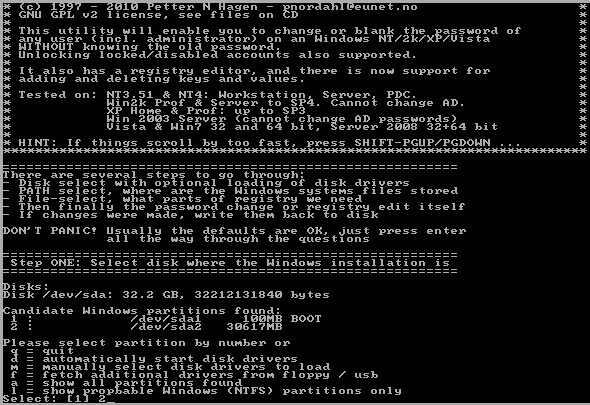
By following the on-screen instructions, in the first step, you will be asked which disk the Windows operating system for which you do not know the administrative password is in. Indicate the number corresponding to the disk unit in the list and hit enter to confirm.
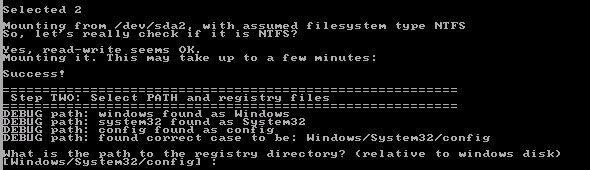
- In the second step you will be prompted to confirm the Path and the registry file. Usually just confirm the path suggested by hitting Enter.
- Indicate the operation "Password reset" by choosing "1" and confirming.

- In the third step choose "1" to "Edit user data and password" and confirm.

- When asked which user you want to change your password for choose the "administrator" user: since it is usually the user suggested, just hit enter without typing anything.

- From the options presented choose "1" for "Clear (blank) user password".

You will then be prompted to indicate a new password, but this option is not very compatible and there is a risk of having to repeat the entire process. By choosing the option of not using a password for the "administrator", user, you can create it after the first access.
- Once you have obtained confirmation of the password change, type "!" to exit and confirm.

- Then type "q" and confirm to exit.

- In the fourth step, you will be prompted to save the changes as soon as they have been made, confirm by typing "y" and hitting enter.

- When you receive confirmation of the completion of the saving process you can turn off or shut down the server. Eject the disk image from the virtual CD/DVD Player and then restart the Server Cloud.
To reset the password of Cloud Servers with openSUSE operating system you need to log into the Cloud Server from the Recovery Console and at the same time keep the Visual Cloud application open and do as follows. Shut down the Cloud Server from Visual Cloud. After logging into the recovery console, start the Cloud Server with Visual Cloud. In the window of the console you will see the start-up process of the Cloud Server with the "grub-boot" message as shown in the image below for around 5 seconds. Before the countdown expires select the type of boot using the arrow keys and press "e" to edit its content. Upon opening the boot file, move to the kernel uploading line (it usually starts with the word "kernel") using the arrow keys and press "e" again to edit its content. At the end of the line add init=/bin/bash and confirm by pressing the enter key. Going back to the previous page press "b" to run the boot again in "single user" mode. The Cloud Server will start and after a few seconds it will be possible to type in new commands after the # symbol. Type in the passwd command and press enter. Type in the new password for the "root" user and press enter. Confirm the new password and press enter. The new password for the "root" user has now been configured successfully and can be used the next time you log into the Cloud Server (to restart type in reboot or force the Reset from the control panel).
In some cases the methods shown may not work and in any case it is never recommended that you force the operating system to reset the access password.