With the exception of the first hard disk (HD) present in the Cloud Server, the additional ones (HD1, HD2, HD3) are supplied RAW: it is necessary to partition and format the RAW space to be able to use it in the Operating System.
- Accessing the Cloud Server via RDP.
- To access Disk Management: Start > Control Panel > System and Security > Administrative Tools (Create and format hard disk partitions).
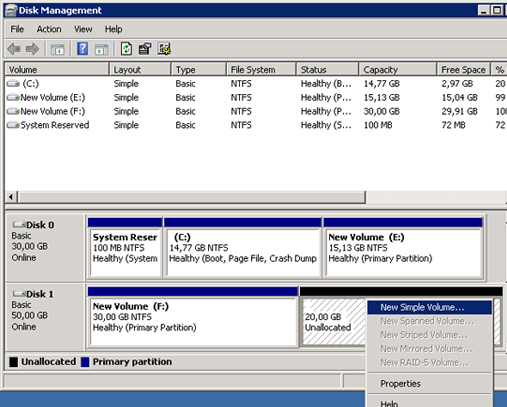
- Right click on the mouse button on the "unallocated" disk space (added space) and select for example "New Simple Volume" by following the steps indicated (choice of the size of the partition and letter allocation, file system type) (fid.1).
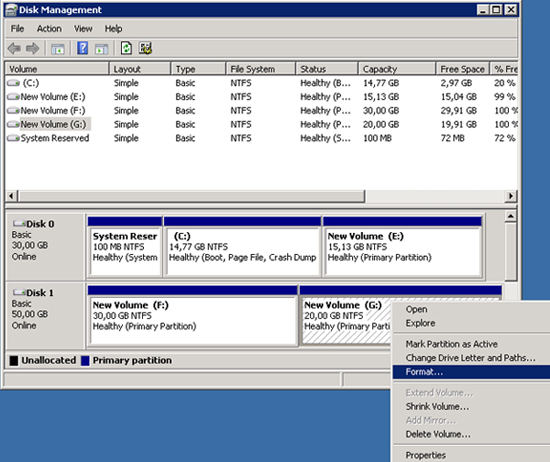
- At the end of this procedure the added space on the disk will be partitioned and ready for formatting (fig.2).
 [fig.1]
 [fig.2]
(parted) print
Model: VMware Virtual disk (scsi)
Disk /dev/sdb: 21.5GB
Sector size (logical/physical): 512B/512B
Partition Table: msdos
Number Start End Size Type File system Flags
1 1049kB 525MB 524MB primary ext4 boot
2 525MB 8590MB 8065MB primary lvm
(parted) mkpart
Partition type? primary/extended? primary
File system type? [ext2]? ext3
Start? 8590MB
End? 21.5GB
(parted) print
Model: VMware Virtual disk (scsi)
Disk /dev/sda: 21.5GB
Sector size (logical/physical): 512B/512B
Partition Table: msdos
Number Start End Size Type File system Flags
1 1049kB 525MB 524MB primary ext4 boot
2 525MB 8590MB 8065MB primary lvm
3 8590MB 21.5GB 12.9GB primary
# mke2fs /dev/sda3
mke2fs 1.41.12 (17-May-2010)
Filesystem label=
OS type: Linux
Block size=4096 (log=2)
Fragment size=4096 (log=2)
Stride=0 blocks, Stripe width=0 blocks
786432 inodes, 3145728 blocks
157286 blocks (5.00%) reserved for the super user
First data block=0
Maximum filesystem blocks=3221225472
96 block groups
32768 blocks per group, 32768 fragments per group
8192 inodes per group
Superblock backups stored on blocks:
32768, 98304, 163840, 229376, 294912, 819200, 884736, 1605632, 2654208
Writing inode tables: done
Writing superblocks and filesystem accounting information: done
- Accessing the Cloud Server via SSH.
- Once you have accessed it, type
fdisk -l from the command line and press enter.
- The information will then be displayed on the disks installed and their partitions.
- Identify the disk to which the space has been added and check the number of partitions already present.
- Run the Parted utility from the command line for the disk on which the space was added, by keying in
parted /dev/sda/ (in the example the unit to be configured is the /dev/sda) and by pressing the Enter key.
- If the disk on which you added the space has never been formatted before, first you need to create the partition table with the
mktable command and selecting the Msdos option, otherwise ignore this step and proceed to the next step.
- Type
print and press enter to make sure that all partitions are already present in the disk.
- To create a new partition for the space added, launch
mkpart and respond to the various prompts. First you are asked to choose the "type" between "primary" and "extended" (we will choose primary) then you are asked for the type of "File System" (for example we choose "ext3" and confirm); then you will be asked for the start and the end of the partition (in our example, if we want to create a partition that corresponds with the added space, simply indicate as the start the "end" value of the partition with the highest number and with the maximum size for the end).
- At this point by re-launching
print we can check that you have created the new partition 3.
- Now you just have to create the Filesystem in the partition created: first exit "parted" by typing
quit and then launch mke2fs for the partition created.
Disk /dev/sdb: 21.4 GB, 21474836480 bytes
255 heads, 63 sectors/track, 2610 cylinders
Units = cylinders of 16065 * 512 = 8225280 bytes
Disk identifier: 0x00000000
Device Boot Start End Blocks Id System
/dev/sdb1 1 2610 20964793+ 82 Linux swap / Solaris
/dev/sdb2 2611 3916 10490445 83 Linux
- Access the Cloud Server via SSH or via Applet Java.
- Once you have accessed it, type
fdisk -l from the command line and press enter.
- The information will then be displayed on the disks installed and their partitions.
- Identify the disk to which the space was added and check the number of partitions already present.
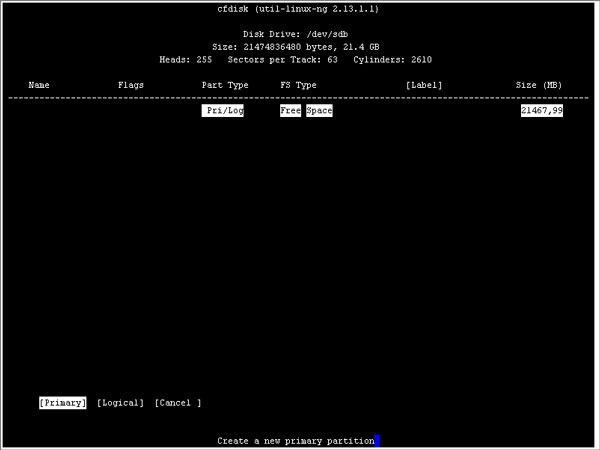
- Launch the CFdisk utility from the command line indicating the disk you want to partition by typing for example
cfdisk /dev/sdb and pressing enter (in this example the disk you want to repartition is dev/sdb/).
- A screen will appear with the features of the disk, and at the top the main partition will be listed and immediately below without a partition we find the space you just added listed. With the down arrow select the line for the space added; with the right arrow move to the command [
New] and press enter. You will be asked to choose between the first two options [Primary] and [Logical] for the new partition: select for example [Primary] and confirm.
Then you will be asked to choose the size of the partition (if the number suggested is left unchanged a partition will be created for all the new disk space) and confirm. The new partition will then be created, and is listed in the main screen with the name sdb2 in our example.
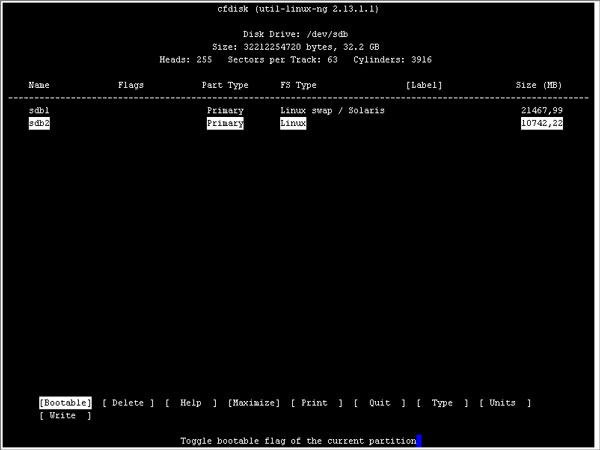
- At this point by still moving with the arrow keys and selecting [
Type] you can choose the Filesystem on the partition created: you will be offered a list of Filesystem types, then type the code corresponding to the type chosen and confirm by pressing enter. The initial screen will be updated with the choice type for the partition created.
- From the main screen by selecting [
Write] you can format the partition created: you will be asked for confirmation to continue with the operation; after a few moments the operation will be completed and you will go back to the main screen.
- To exit move to [
quit] and to check by re-typing fdisk -l we can also see the new partition created in the list of disks.
The operations described are examples: the improper use or use without due care and skill, can cause the partial and total loss of data, and in some cases may jeopardize the correct operation of the virtual server. Using this guide without the appropriate skills is not recommended. Aruba S.p.A. does not accept any responsibility for any problems or damage caused by using these guides