In the "
VMS" section.

From the list of VMs shown, choose which one you want to restore by clicking on that line (it will be highlighted in blue). Once you have selected the VM, the menu buttons in the top left of the page will go from disabled,

to enabled.

Click on Restore VM to see a list that gives you two options:
Overwrite and
Keep.
 Overwrite
: the VM will be overwritten.
Keep: a new VM will be created called
Original NameVM_restored.
Overwrite
Once you have chosen the VM from the list and selected "
Overwrite" from the
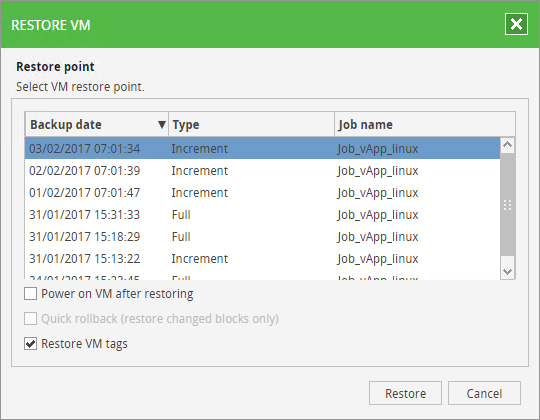
"Restore VM" list, the following window will appear,

with a list of all the backups available for that VM.
For each individual backup, you can see: the date, the type of backup (Incremental or Full) and the Job that created it. You can choose from three options:
- Power on VM after restoring: if this option is selected the VM will be turned back on at the end of the restore process; otherwise, it will stay switched off;
- Quick rollback (restore changed blocks only): if selected, this option speeds up the process by only restoring blocks that have been changed;
- Restore VM tags: if this option is selected, the tags assigned to the original VM are restored;
Once you have chosen which backup you want to restore to the VM, and set up any options, you need to click on "
Restore". A confirmation message will appear asking if you want to proceed.
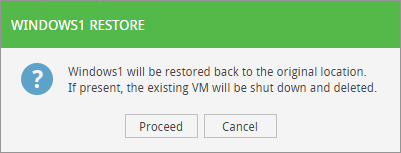
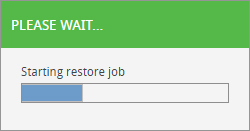
Click on "
Proceed" to start the restore process. A window will appear showing the progress of the restore process.
Keep
Once you have chosen the VM from the list and selected "
Keep" from the "
Restore VM" list, the following window will appear,
with a list of all the backups available for that VM.
For each individual backup, you can see: the date, the type of backup (Incremental or Full) and the Job that created it. There are two options available:
- Power on VM after restoring: if this option is selected the VM will be turned back on at the end of the restore process; otherwise, it will stay switched off;
- Restore VM tags: if this option is selected, the tags assigned to the original VM are restored;
Once you have chosen which backup you want to restore to the VM, and set up any options, you need to click on "
Restore". A confirmation message will appear asking if you want to proceed.
Click on "
Proceed" to start the restore process. A window will appear showing the progress of the restore process.
The new VM created (
OriginalNameVM_restored) will be visible within your Private Cloud. The new VM will appear at the
second stage of creating and/or editing a Job, in the structure for your organization.
For more technical and sales information please
contact our team of experts. To view the official documentation about using the Web Panel, provided by Veeam, click
here.