COMPUTING > Virtual Private Cloud > VMware vCloud Director > How to set up a VPN connection with OpenVPN on Ubuntu 20.04

3.4.1.2 How to set up a VPN connection with OpenVPN on Ubuntu 20.04

A VPN (Virtual Private Network) is a virtual private network which enables the protected network connection between two independent data networks on the internet. Using a VPN, therefore, a server or PC (client) connected to the internet in one place can access the network resources of another server, creating a direct virtual network connection between the two and in effect, replicating the physical connection between two network points.

OpenVPN is an open source software that lets you create a VPN, based on TLS/SSL (Transport Layer Security/Secure Sockets Layer), using certificates to encrypt traffic securely between the server and one or more clients.
 
This guide explains how to configure/establish a VPN using OpenVPN, on a Linux Server and Client, using Ubuntu 20.04 . Some parts of these guidelines (relating to the Server or the Client) may also be used for hybrid (e.g. Windows Server and Linux Client, or viceversa) configuration/implementation.

To follow the instructions in the guide, you will need:
  • Server – main server (Ubuntu) for the VPN connection;
  • CA machine - server (Ubuntu) which will serve as CA machine, or Certificate Authority and will be responsible for verifying the validity of certificates (may also be the main Server used for the VPN connection);
  • Client – secondary device (Ubuntu) for the VPN connection.
You will need to connect to your Server, to your CA machine and to the Client through a SSH connection.
 
First, sign in to your Server and install OpenVPN (these guidelines are also valid Client-side).
 
The installer can be used on a Server and Client Linux operating system.

N.B. OpenVPN already exists in the official Ubuntu repository, so no additional ones are required.

Type:
 

$ sudo apt update
$ sudo apt install openvpn

At this point you will have successfully installed OpenVPN on your Server.
 
The same OpenVPN installation procedure must be replicated Client-side.
Continue by downloading EasyRSA onto your Server and your CA machine, typing the following on both machines:
 

$ wget -P ~/ https://github.com/OpenVPN/easy-rsa/releases/download/v3.0.4/EasyRSA-3.0.4.tgz

You can download the latest version from https://github.com/OpenVPN/easy-rsa/releases
 

$ cd ~
$ sudo tar xvf EasyRSA-3.0.4.tgz


N.B. The name may differ, according to the version downloaded.
Configure the Server by typing:
 

$ sudo cp /usr/share/doc/openvpn/examples/sample-config-files/server.conf.gz /etc/openvpn/
$ sudo gzip -d /etc/openvpn/server.conf.gz
$ sudo nano /etc/openvpn/server.conf

Find the section on HMAC ("tls-auth"). If you find the line has been commented, remove the ";".
Find the section on encryption ("cipher"). If you find the line has been commented, remove the ";" and add a new line directly underneath with the text "auth SHA256".
Find the "dh" section, defining the Diffie-Hellman parameters and remove "2048" from the name (You should have "dh dh.pem").

Find the "user" and "group" sections and remove the ";" to uncomment the lines.
Once you have installed EasyRSA on your CA machine, a configuration file has been created which can be used to define the variables for your CA. Type:
 

$ cd ~/EasyRSA-3.0.4/
$ sudo cp vars.example vars
$ sudo nano vars

Uncomment the commands displayed below:

Modifica le variabili

Run the "easyrsa" script to launch the Public Key Infrastructure (PKI):
 

$ sudo ./easyrsa init-pki
$ sudo ./easyrsa build-ca nopass

This command will create two files:
  • ca.crt: public certificate for the CA machine used by the Server and the Client to let each other know that they are part of the same secure network.
  • ca.key: private key used by the CA machine to sign keys and certificates for the Server and the Client. This file must be kept on the CA machine only (not accessible to third parties) so as not to compromise the security of the network.
You will be asked to enter a name. Leave this blank and press Send.
Now that you have configured the CA machine, you must generate a private key and a certificate request on the Server and send them to the CA machine to be signed:
 

$ cd ~/EasyRSA-3.0.4
$ sudo ./easyrsa init-pki
$ sudo ./easyrsa gen-req server nopass

To simplify things, leave the machine name as "server" otherwise you will have to make several changes later on.

You have just created a private key for the Server and a certificate request called "server.req":
 

$ sudo cp ~/EasyRSA-v3.0.6/pki/private/server.key /etc/openvpn/

Copy the server.req onto the CA machine:
 

$ sudo scp ~/EasyRSA-3.0.4/pki/reqs/server.req user@your_CA_ip:/tmp

In the EasyRSA folder on your CA machine, import the file you have just copied and sign it:
 

$ cd ~/EasyRSA-3.0.4/
$ sudo ./easyrsa import-req /tmp/server.req server
$ sudo ./easyrsa sign-req server server

Type "yes" and press Send.

Transfer the signed certificate and the ca.crt to the Server VPN:
 

$ sudo scp pki/issued/server.crt user@your_server_ip:/tmp
$ sudo scp pki/ca.crt user@your_server_ip:/tmp

Next, copy the files received into the correct directories in your Server:
 

$ sudo cp /tmp/{server.crt,ca.crt} /etc/openvpn/
$ cd ~/EasyRSA-3.0.4/

and generate a key exchange:
 

$ sudo ./easyrsa gen-dh
$ sudo openvpn --genkey --secret ta.key

Copy the files generated into the "/etc/openvpn/" folder:
 

$ sudo cp ~/EasyRSA-3.0.4/ta.key /etc/openvpn/
$ sudo cp ~/EasyRSA-3.0.4/pki/dh.pem /etc/openvpn/

Now you need to access the Ubuntu machine that will act as Client in the VPN connection.

Once you have installed the OpenVPN on this machine, create a folder in which to archive Client certificates and keys. This guide contains only one Client, called "client1", but the operation must be repeated for each subsequent Client, changing the name accordingly.
 

$ sudo mkdir -p ~/client-configs/keys
$ sudo chmod -R 700 ~/client-configs
$ cd ~/EasyRSA-3.0.4/
$ sudo ./easyrsa gen-req client1 nopass

Press Send to accept the standard name suggested.
Copy the Client key into the folder created earlier:
 

$ sudo cp pki/private/client1.key ~/client-configs/keys/


Send the client1.req file to the CA machine:
 

$ sudo scp pki/reqs/client1.req user@your_CA_IP:/tmp

Import the certificate request to your CA machine:
 

$ cd ~/EasyRSA-3.0.4/
$ sudo ./easyrsa import-req /tmp/client1.req client1
$ sudo ./easyrsa sign-req client client1

Type "yes" to authorize the signature.
Transfer the certificate to your Server machine:
 

$ sudo scp pki/issued/client1.crt utente@IP_SERVER:/tmp

Copy the following files into the correct folders in your Server:
 

$ sudo mkdir -p ~/client-configs/keys
$ sudo chmod -R 700 ~/client-configs
$ sudo cp /tmp/client1.crt ~/client-configs/keys/
$ sudo cp ~/EasyRSA-3.0.4/ta.key ~/client-configs/keys/
$ sudo cp /etc/openvpn/ca.crt ~/client-configs/keys/

At this point, both the certificates and keys for the Server and the Client have been generated.
You now need to change the forwarding rules for Ips on the Server-side.
 

$ sudo nano /etc/sysctl.conf

Find the "net.ipv4.ip_forward" section and remove the "#" to uncomment the command.

Some of the firewall rules must be changed to route the Client connections correctly.
 

$ ip route | grep default

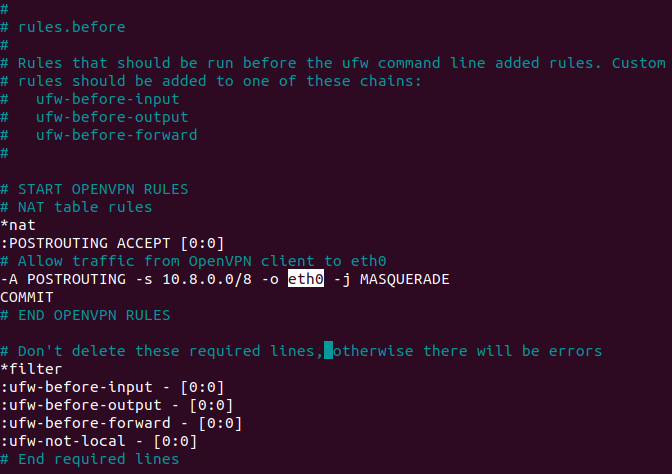
Make a note of the name after "dev" (in the image the name is "eth0").

Configura la rete di OpenVPN

$ sudo nano /etc/ufw/before.rules

Add the commands as shown below, replacing "eth0" with the name of your network interface.

Configura la rete di OpenVPN

Save and exit.
 

$ sudo nano /etc/default/ufw

Edit the "DEFAULT_FORWARD_POLICY" parameter with "ACCEPT".

Enable port 1194 for UDP traffic and port 22 for SSH traffic:
 

$ sudo ufw allow 1194/udp $ sudo ufw allow OpenSSH

Restart the firewall:
 

$ sudo ufw disable
$ sudo ufw enable

Start the OpenVPN service:
 

$ sudo systemctl start openvpn

Check the status of the service. If everything was successful, the screen will look like the one shown here.
 

$ sudo systemctl status openvpn

Stato del servizio di OpenVPN

Run the service when the Server is switched on:
 

$ sudo systemctl enable openvpn

Create the basic configuration for Clients:
 

$ sudo mkdir -p ~/client-configs/files
$ sudo cp /usr/share/doc/openvpn/examples/sample-config-files/client.conf ~/client-configs/base.conf
$ sudo nano ~/client-configs/base.conf

Find the "remote" section and check that it reads "remote IP_Server 1194"
 
  • IP_Server: Enter the Server IP
  • 1194: port selected earlier.
Find the "proto" section to check that the Server is set to UDP (you will find the TCP line commented with a ";").

Go to the "user" and "group" sections and remove the ";" to "uncomment" them.

Go to the "ca.crt" - "client.crt" - "client.key" - "ta.key" sections and comment with a"#" at the start of each line.

Go to the "cipher" section and add the command "auth SHA256" under the command "cipher AES-256-CBC".

Add the command "key-direction 1", wherever you like.

Add these commented lines somewhere. If the Client is a Linux machine, these need to be uncommented.
 

# script-security 2
# up /etc/openvpn/update-resolv-conf
# down /etc/openvpn/update-resolv-conf

Save and exit.
On your Server, create a script that will automatically fill in the configuration of a Client:
 

$ sudo nano ~/client-configs/make_config.sh

Copy and paste the following text:
 

#!/bin/bash
# First argument: Client identifier
KEY_DIR=~/client-configs/keys
OUTPUT_DIR=~/client-configs/files
BASE_CONFIG=~/client-configs/base.conf
cat ${BASE_CONFIG} \
    <(echo -e '<ca>') \
    ${KEY_DIR}/ca.crt \
    <(echo -e '</ca>\n<cert>') \
    ${KEY_DIR}/${1}.crt \
    <(echo -e '</cert>\n<key>') \
    ${KEY_DIR}/${1}.key \
    <(echo -e '</key>\n<tls-auth>') \
    ${KEY_DIR}/ta.key \
    <(echo -e '</tls-auth>') \
    > ${OUTPUT_DIR}/${1}.ovpn

Save the file and make it executable:
 

$ sudo chmod 700 ~/client-configs/make_config.sh

Finally, try to generate the configuration for the Client "client1":
 

$ cd ~/client-configs
$ sudo ./make_config.sh client1

File client1.ovpn will be created.

Next, you need to transfer this file onto the device you intend to use as Client, the one that will be used by the VPN software for the connection.
To revoke Client certificates, perform the following commands on your CA machine:
 

$ cd EasyRSA-3.0.4/
$ sudo ./easyrsa revoke client1

client1 is the name of the Client whose authorization is to be revoked.

Type "yes" to confirm.

Generate the crl.pem file and send it to your Server:
 

$ sudo ./easyrsa gen-crl
$ sudo scp ~/EasyRSA-3.0.4/pki/crl.pem user@IP_Server:/tmp

Update the configuration on your Server to verify the order to revoke:
 

$ sudo cp /tmp/crl.pem /etc/openvpn
$ sudo nano /etc/openvpn/server.conf

At the end of the file, add "crl-verify crl.pem".

Save and close.
 

$ sudo systemctl restart openvpn@server

Reboot the Server to implement the changes.