It is possible to install a new operating system, using a Virtual CD-DVD Player, at any time and on any Cloud Server. However, if you wish to install an operating system via Virtual CD-DVD Player, we recommend that you create a new Cloud Server.
Here's a recap of the steps you need to follow:
1 - Activate the FTP Space
2 - Upload the ISO file on the FTP Space
3 - Create a Cloud Server Importing from FTP
Log in the Control Panel and create a Cloud Server. When selecting the operating system click on the "
Import from FTP" tab.

Click on "
Activate".

Then indicate just the size of the primary disk
without connecting any image to the disk.

Proceed to create the Cloud Server.
4 - Upload the ISO file on the Virtual CD/DVD Player
At this stage you need to upload the ISO file (previously uploaded on the FTP space) on the Virtual CD/DVD Player of the Cloud Server. Open the technical details page of the Cloud Server (through the "
Manage" button). Scroll down the page up to the "
Virtual CD/DVD Player" section and click on "
Upload".

A window will open with a list of all the ISO images available in your FTP space.
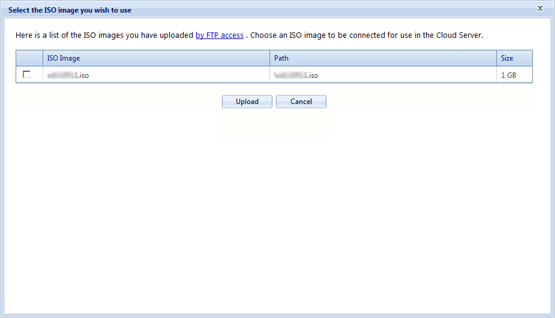
Select the file of the ISO disk image that you wish to upload on the Virtual CD/DVD Player and confirm.
Wait for the upload process to be completed. Once completed the ISO file will be displayed in the Virtual CD/DVD Player.

Given that this is an installation CD-DVD you are advised, if not required, to make sure that the ISO image uploaded on the CD-DVD, is a boot image.
Should you not have any ISO images for Linux/Ubuntu/Debian operating systems we remind you that you can download them for free from the web.
If, however you need ISO images for Windows operating systems, Microsoft offers downloadable versions to customers with a Technet account. We remind you that Microsoft requires you to activate the installed operating system within thirty days.
5 - Switch off the Cloud Server
Switch off the Cloud Server by following the relevant process. Depending on the Hypervisor you choose and the respective Tools, it may be that you are not able to use the "
Stop" command on Cloud Servers without operating system, in this case the only way to switch off the Cloud Server is to "
Force Switch off".
6 - Connecting to the Cloud Server via the Recovery Console
The
Recovery Console is the only tool that will allow you to access the created Cloud Server at this stage. The Cloud Server in fact at this stage does not have a Public IP and is not connected to the network, therefore cannot be accessed through standard
modes of connection (RDP, SSH, VMware vSphere Client, VMware vSphere Web Client and Applet RDP/SSH).
7 - Start up the Cloud Server from the Virtual CD/DVD player
Now you need to access the Cloud Server in order to install the operating system. Both Hyper-V and VMware have the priority of the CD/DVD on the HD set in the boot order during start up. Therefore simply start up the Cloud Server to proceed with the installation from the Virtual CD/DVD Player.
• Restart the Cloud Server
Start up the Cloud Server from the Control Panel.
• Access the Cloud Server from the Recovery Console
8 - Install the Operating System
By using the Recovery Console you can now install the operating system. Depending on the type of operating system you are installing you may be required to restart a few times.
9 - Switch off the Cloud Server
After completing the installation you need to
switch off the Cloud Server.
10 - Eject the Virtual CD/DVD
After completing the installation of the operating system you need to
eject the disk (ISO file) from the Virtual CD/DVD player: this is essential because it will prevent the Cloud Server from performing the installation again starting from the Virtual CD/DV player at the following start up.
To eject the uploaded image access the technical details page of the Cloud Server found in the Control Panel and click on the "
Eject" button found in the "
Virtual CD/DVD Player " section.
11 - Restart the Cloud Server
Restart the Cloud Server, which will now load the Operating System that you have setup.
12 - Access the Cloud Server via Recovery Console
Now the Cloud Server has a functional Operating System, but since it is not connected to the external network and it does not have a Public IP it can only be reached from the Recovery Console.
To activate the connections of a Cloud Server you need to:
• Configure the login details (User and Password)
You need to configure the login details (Username and Password) so you can then access the Cloud Server using one of the
modes of connections (RDP, SSH).
• Associate a Public IP
• Configure the Network adapter with associated Public IP
Once you have assigned a Public IP to the Cloud Server you need to setup the connection via network adapter. Based on the loaded operating system it is possible to do this by following the relevant Cloud Server guides:
-
Windows
-
Linux
-
Linux Debian / Ubuntu
-
Linux openSuse• Enable Remote Access to access in RDP (for Windows Cloud Servers)
If you are creating a Cloud Server with Windows operating system we remind you to enable the remote access to allow connection via RDP.
• Remove settings such as screensaver, stand-by, energy saving, hibernate, etc ...
We remind you to remove any settings there may be to avoid making the Cloud Server not reachable via standard
modes of connection. If you happen to leave out some configurations you can always access the Cloud Server from the
Recovery Console to make any adjustments.
• Install the Tools provided by the Hypervisors
The
Tools provided by the Hypervisors, can be helpful in managing your virtual machine and we therefore recommend that you install them.