What you need to access the Smart Storage service
- An enabled protocol;
- the information available in the General information section of the details page;
- the password you assigned to the service.
Protocols
To start using Smart Storage, you must first enable at least one of the available protocols (
SFTP/SSH,
Samba or
WebDAV) and enable the
External reachability feature.
- Go to the Smart Storage details page;
- scroll down and select the Protocols tab.
| SFTP/SSH support |
Enables the SFTP / SSH protocol. |
| Samba support |
Enables the SMB (Samba) protocol. |
| WebDAV support |
Enables the WebDAV protocol. |
| External reachability |
Publishes the IP address on the Internet. If this feature is not enabled, you will not be able to access your Smart Storage over the Internet. |
| display snapshot directory |
Lets you display the .zfs directory as a hidden folder within each smart folder. This allows you to access snapshot files and choose which ones to recover. |
Accessing via SFTP
Enable
SSH support in the
Protocols section of the Smart Storage
details page.
You need the information available in the
General information section of the details page:
- Server - for example, SSU1234567890.smartstorage.aruba.it
- Username - for example, SSU1234567890
and the password you assigned to the service.
Example of a connection using the CyberDuck client
- Run the CyberDuck client;
- open a new connection;
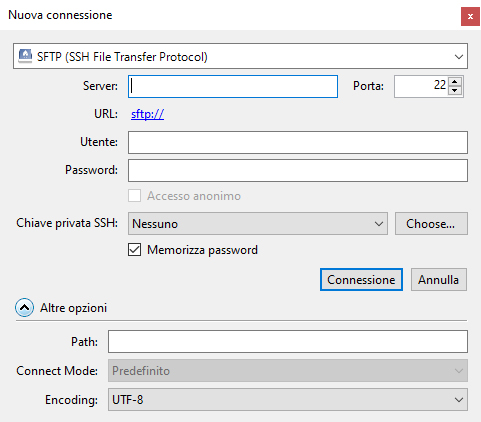
- configure the new connection using the following parameters:
| Protocol: |
SFTP (SSH File Transfer Protocol) |
| Server: |
for example, SSU1234567890.smartstorage.aruba.it |
| Port: |
22 |
| Username: |
for example, SSU1234567890 |
| Password: |
the password you assigned to the service |
| Path: |
for example, SSU1234567890 |
Accessing via SMB (Samba)
Enable
Samba support in the
Protocols section of the Smart Storage
details page.
You need the information available in the
General information section of the details page:
- Server - for example, SSU1234567890.smartstorage.aruba.it
- Username - for example, SSU1234567890
and the password you assigned to the service.
Example of a connection using the CyberDuck client
- Run the CyberDuck client;
- open a new connection;
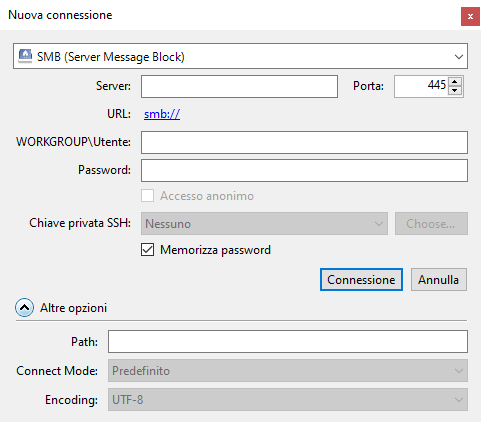
- configure the new connection using the following parameters:
| Protocol: |
SMB (Server Message Block) |
| Server: |
for example, SSU1234567890.smartstorage.aruba.it |
| Port: |
445 |
| WORKGROUP\Username: |
for example, SSU1234567890 |
| Password: |
the password you assigned to the service |
| Path: |
for example, SSU1234567890 |
Accessing via WebDAV
Enable
WebDAV support in the
Protocols section of the Smart Storage
details page.
You need the information available in the
General information section of the details page:
- Server - for example, SSU1234567890.smartstorage.aruba.it
- Username - for example, SSU1234567890
and the password you assigned to the service.
Example of a connection using the CyberDuck client
- Run the CyberDuck client;
- open a new connection;
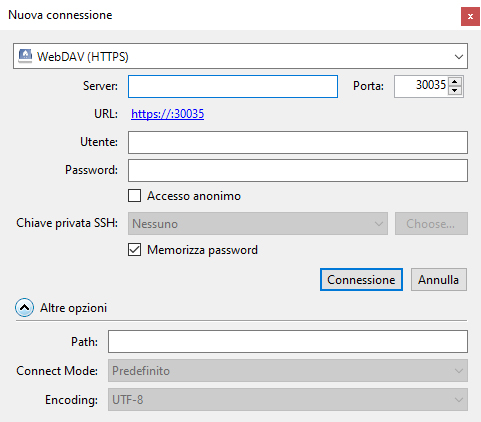
- configure the new connection using the following parameters:
| Protocol: |
WebDAV (HTTPS) |
| Server: |
for example, SSU1234567890.smartstorage.aruba.it |
| Port: |
30035 (change the default value of 443) |
| Username: |
for example, SSU1234567890 |
| Password: |
the password you assigned to the service |
| Path: |
for example, SSU1234567890 |
Accessing via a network drive (Samba)
Enable
Samba support in the
Protocols section of the Smart Storage
details page.
You need the information available in the
General information section of the details page:
- Server - for example, SSU1234567890.smartstorage.aruba.it
- Username - for example, SSU1234567890
- SAMBA - for example, \\SSU1234567890.smartstorage.aruba.it\SSU1234567890
and the password you assigned to the service.
Samba is free software that implements the SMB (Server Message Block) network protocol and allows you to access remote resources over the Internet.
Creating a connection from a Windows PC to Smart Storage
- Right-click This PC;
- select Map network drive...;
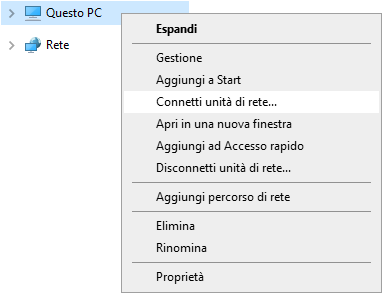
- in the Folder field, enter the SAMBA value (for example, \\SSU1234567890.smartstorage.aruba.it\SSU1234567890);
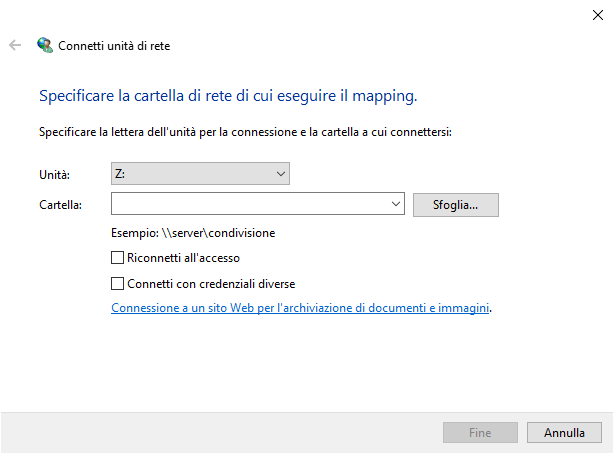
- click Finish;
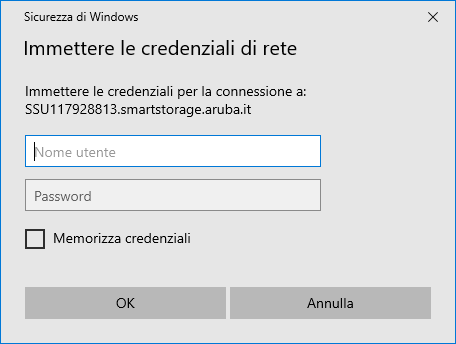
- enter the Username (for example, SSU1234567890) and Password, then click OK.
Accessing via SSH
You must have enabled
SSH support in the General information section of the Smart Storage details page.
You need the information available in the
General information section of the details page:
- Server - for example, SSU1234567890.smartstorage.aruba.it
- Username - for example, SSU1234567890
and the password you assigned to the service.
Example of a connection using Windows PowerShell
- Run Windows PowerShell:
-
PS C:\Users\first.last>
- enter the ssh command followed by username@server:
-
PS C:\Users\first.last> ssh SSU1234567890@SSU1234567890.smartstorage.aruba.it
- when prompted:
-
Are you sure you want to continue connecting (yes/no/[fingerprint])?
- confirm by entering yes:
-
Are you sure you want to continue connecting (yes/no/[fingerprint])? yes
- when prompted for the password:
-
[email protected]'s password:
- enter the password.
Enabled commands
cat
chmod
cp
dd
df
du
grep
head
ls
md5sum
mkdir
mv
pwd
rm
rmdir
rsync
sha1sum
sha256sum
sha512sum
stat
tail
touch
unlink