Snapshot features
A snapshot is a copy of the contents of a storage space at a specific point in time. By restoring a snapshot (rollback), you can recover the contents that were present in the storage space when the snapshot was created.
You can create a snapshot of the entire Smart Storage space or of specific folders (
smart folders) that you have created.
Difference between a storage space snapshot and a smart folder snapshot
A snapshot of a
smart folder is created only for that specific folder.
A Smart Storage snapshot is created for the entire storage space, excluding smart folders.
For example, if your Smart Storage space contains:
- 10 files
- 4 folders
- smart folder A
- smart folder B
The snapshot of smart folder A includes only smart folder A.
The snapshot of smart folder B includes only smart folder B.
The storage space snapshot (e.g. SSU1234567890) includes only the 10 files and 4 folders, including all their contents.
If you want to protect all the items in your Smart Storage, you must create:
- a snapshot of the storage space;
- a snapshot for each smart folder.
Automatic snapshots
When creating an automatic snapshot, you must specify the number of iterations, i.e. how many copies of that specific snapshot you want to keep available (
retention).
The number of iterations you specify will be deducted from the number of snapshots that remain available.
Available snapshots
The number of available snapshots is calculated by subtracting the number of manual snapshots plus the number of automatic snapshots multiplied by their respective iterations from the number of snapshots included in the plan. For example, if you have a Smart Storage plan that includes 40 snapshots and you have enabled:
- 3 manual snapshots
- 2 automatic snapshots with 3 iterations
- 4 automatic snapshots with 5 iterations
the calculation will be:
- 3 + (2x3) + (4x5) = 3 + 6 + 20 = 29 snapshots used
- 40 total snapshots - 29 snapshots used = 11 snapshots available
Incremental snapshots
Automatic snapshots with at least 2 copies are incremental. Only the first snapshot includes all the data (either the entire Smart Storage space or the individual smart folder); subsequent snapshots record only the changes made since the last snapshot (see the
example below).
Example of a daily automatic snapshot with 3 iterations starting on Monday
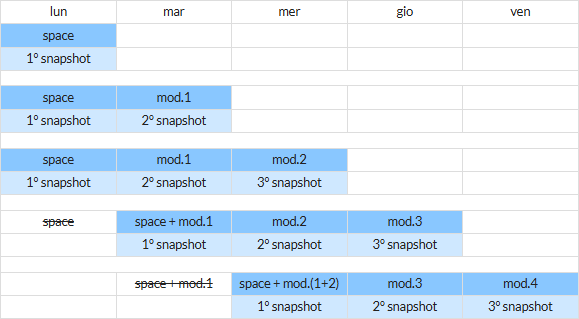
If you set the number of iterations to 3:
- Monday - a full copy of the entire storage space or the selected smart folder will be created;
- you will therefore have one snapshot (Monday);
- Tuesday - any changes made on Tuesday will be recorded;
- you will therefore have two snapshots (Monday + Tuesday);
- Wednesday - any changes made on Wednesday will be recorded;
- you will therefore have three snapshots (Monday + Tuesday + Wednesday);
- Thursday - Monday's snapshot will be merged with Tuesday's snapshot and then deleted, while any changes made on Thursday will be saved;
- you will therefore have three snapshots (Tuesday + Wednesday + Thursday);
- Friday - Tuesday's snapshot will be merged with Wednesday's snapshot and then deleted, while any changes made on Friday will be saved;
- you will therefore have three snapshots (Wednesday + Thursday + Friday).
Creating a manual snapshot
- Go to the Smart Storage details page;
- scroll down and select the Snapshot tab;
- in the Created snapshots / Manual (Available x of y) area, select + Create Manual Snapshot;
- in the Create manual snapshot window, choose what you want to create the snapshot for:
- the entire Smart Storage space (e.g. SSU1234567890)
- a specific smart folder, if available (e.g. smart-folder-name);
- select Create snapshot;
- the newly created snapshot will be listed in the Created snapshots / Manual section.
Applying a created manual snapshot
- Find the snapshot you created and select the three dots at the end of the corresponding row;
- select Apply from the list;
- in the window that opens, confirm the Apply snapshot operation;
- the snapshot is now updated to the time when it was applied.
Applying a manual snapshot
To apply a snapshot, proceed as follows:
- go to the Smart Storage details page;
- select the Snapshot tab;
- in the Created snapshots section, find the snapshot you want to apply;
- select the corresponding Apply button.
When you use the Apply function on a snapshot (manual or automatic), keep in mind that all snapshots (manual or automatic) created subsequently for the same item (the entire Smart Storage space or a specific smart folder) will be deleted.
For example, suppose you created:
- 1 manual snapshot A (Monday);
- 1 manual snapshot B (Thursday);
- 1 automatic snapshot (daily, starting on Tuesday).
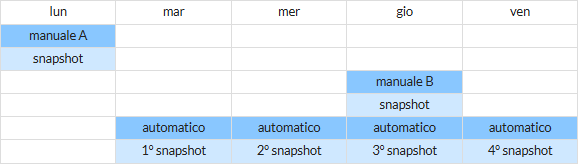
If on Friday you decide to apply the automatic snapshot created on Tuesday:
- the manual snapshot from Monday will remain (because it was created earlier);
- the snapshot from Thursday will be deleted (because it was created later);
- the automatic snapshots from Wednesday, Thursday and Friday will be deleted (because they were created later).
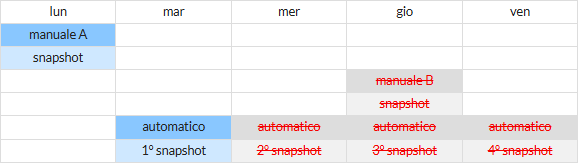
On the following day (Saturday), the automatic snapshot schedule will continue and retain the configured number of iterations.
Creating an automatic snapshot
- Go to the Smart Storage details page;
- scroll down and select the Snapshot tab;
- in the Scheduled / automatic snapshots area, select + Create snapshot;
- in the Schedule automatic snapshot window, choose:
- what you want to create the snapshot for:
- the entire Smart Storage space (e.g. SSU1234567890)
- a specific smart folder, if available (e.g. smart-folder-name);
- choose the required parameters:
- the snapshot status (enabled or disabled);
- the frequency (hourly, daily, weekly or yearly) and any additional parameters (day of the month, week, hour or minutes);
- the number of iterations, which must not exceed the number of available snapshots included in your Smart Storage plan;
- select Schedule snapshot to complete the setup;
- the newly created snapshot will be listed in the Scheduled / automatic snapshots section.
Disabling/enabling automatic snapshot scheduling
Disabling
- Find the automatic snapshot (Active) and select the three dots at the end of the corresponding row;
- select Disable from the list;
- in the Disable snapshot window that opens, confirm the operation;
- the snapshot status will change to Inactive;
- disabling an automatic snapshot does not delete it: snapshot scheduling is suspended.
Enabling
- Find the automatic snapshot (Inactive) and select the three dots at the end of the corresponding row;
- select Enable from the list;
- in the Enable snapshot window that opens, confirm the operation;
- the snapshot status will change to Active.
What happens when you delete a snapshot
Deleting a snapshot is irreversible and results in the complete loss of the data saved in that snapshot.
Deleting a snapshot
- Go to the Smart Storage details page;
- scroll down and select the Snapshot tab;
- you can delete both scheduled / automatic snapshots and created / manual snapshots;
- find the snapshot you want to delete and select the three dots at the end of the corresponding row;
- select Delete from the list;
- in the Delete snapshot window, confirm the operation.