How to access Veeam Restore Portal
To access Veeam Restore Portal, follow these steps:
- access the Backup for Microsoft 365 account details page;
- scroll down to the Manage Services section;
- select GO TO PANEL next to Restore Portal.
How to establish the trust
To allow users in your Microsoft 365 organization to access Veeam Restore Portal, view restore points and perform restores, you must establish a trust at Azure AD level between your Microsoft 365 organization and Veeam Restore Portal.
The procedure varies depending on the solution purchased.
Dedicated solution
Prerequisites
You must have configured the service in
Veeam Service Provider Console.
You must have Microsoft 365 administrator credentials (username and password).
To establish the trust for a dedicated solution, you must
contact support and follow these steps:
- after purchasing the service, you will be contacted by Aruba Cloud technical staff;
- you will receive a compressed file named VB365_script_cert.rar containing:
- the script New-VB365EnterpriseApplicationCustomer.ps1;
- a certificate named admin01-xxxxxx.eu-it01.veeam.o365.cloud.it.crt;
- run the script as described below;
- when the script finishes, it returns the Application ID;
- provide the Application ID to Aruba Cloud;
- Aruba Cloud will complete the configuration and send you a confirmation.
Configuring the dedicated solution may take several business days. The monthly billing period starts only when Aruba Cloud activates the service.
To run the script:
- open PowerShell as an administrator;
- use the cd command to navigate to the folder containing the script. For example:
cd C:\User\Administrator\Downloads\
- run the script, passing the certificate as a parameter:
.\New-VB365EnterpriseApplicationCustomer.ps1 -Certificate 'admin01-xxxxxx.eu-it01.veeam.o365.cloud.it.crt'
- the Microsoft Sign in window will open:
- if you are already signed in to Azure AD, select the administrator account;
- if you are not signed in, select Work or school account and then Continue;
- sign in using your Microsoft 365 administrator credentials;
- if prompted, complete authentication using Microsoft Authenticator;
- confirm by selecting OK and complete the sign-in process by selecting Done.
- when the procedure is complete, the Application ID is returned:
Application ID 5c2w1c21-cx20-494d-a38c-5e78331a522r
- a file named admin01-xxxxxx.eu-it01.veeam.o365.cloud.it.txt containing the Application ID is also created in the same folder.
Shared solution
The original script has a .ps1 extension, but it is provided in a .zip file. You must extract it before running it.
- open PowerShell as an administrator;
- run the command:
powershell -noprofile -executionpolicy bypass -file ".\Connect-VB365RestorePortal.ps1"
- if the required modules are not present, they will be installed automatically;
- sign in using your Microsoft 365 administrator credentials;
- depending on the active sessions, you may be prompted to sign in twice;
- if the procedure is successful, a message similar to the following will appear:
...
Admin consent detected (grants/assignments exist).
You can now login to the Service Provider's VB365 Restore Portal!
...
- the message confirms that the account is correctly connected to Microsoft Azure and that the application has been configured.
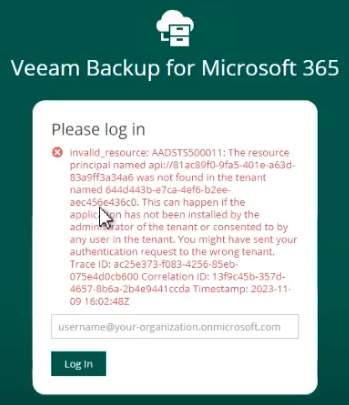
Access error due to missing trust
If you have not
established the trust at Azure AD level between your Microsoft 365 organization and Veeam Restore Portal, an end user will not be able to access the portal correctly, even if they have the restore operator role, and an error will be displayed.