COMPUTING > Virtual Private Cloud > VMware vCloud Director > How to set up a VPN connection with OpenVPN on Windows Server 2019

3.4.1.1 How to set up a VPN connection with OpenVPN on Windows Server 2019

A VPN (Virtual Private Network) is a virtual private network which enables the protected network connection between two independent data networks on the internet. Using a VPN, therefore, a server or PC (client) connected to the internet in one place can access the network resources of another server, creating a direct virtual network connection between the two and, in effect, copying the physical connection between two network points.

A VPN can be established using regular operating systems, including Windows, and a service such as OpenVPN. An open source software enables an encrypted virtual tunnel, based on TLS/SSL (Transport Layer Security/Secure Sockets Layer), to be created using certificates to pass traffic securely between the server and one or more clients.
 
This guide explains how to configure/establish a VPN with OpenVPN, on a Server and a Client which both use Windows Server 2019. Some parts of these guidelines (relating to the Server or the Client) may also be used for hybrid (e.g. Windows Server and Linux Client, or viceversa) configuration/deployment.

In order to connect to the same network, the two or more devices (client and server) connected to the VPN must have access to port 1194.

This can be done to allow UDP traffic to the port by adding a rule to your firewall.
Start by downloading the OpenVPN installer for Windows Server 2019 directly from the official website.
 
The installer can be used on a Windows operating system both Server-side and Client-side.

Once the file has been downloaded, open and launch installation. Make sure you check the "EasyRSA 2 Certificate Management Scripts" box and then click on "Next".


Continue the installation, clicking on each step, when requested.
Once the first stage of installing OpenVPN is complete, the certificates and keys required to access the VPN must be generated.

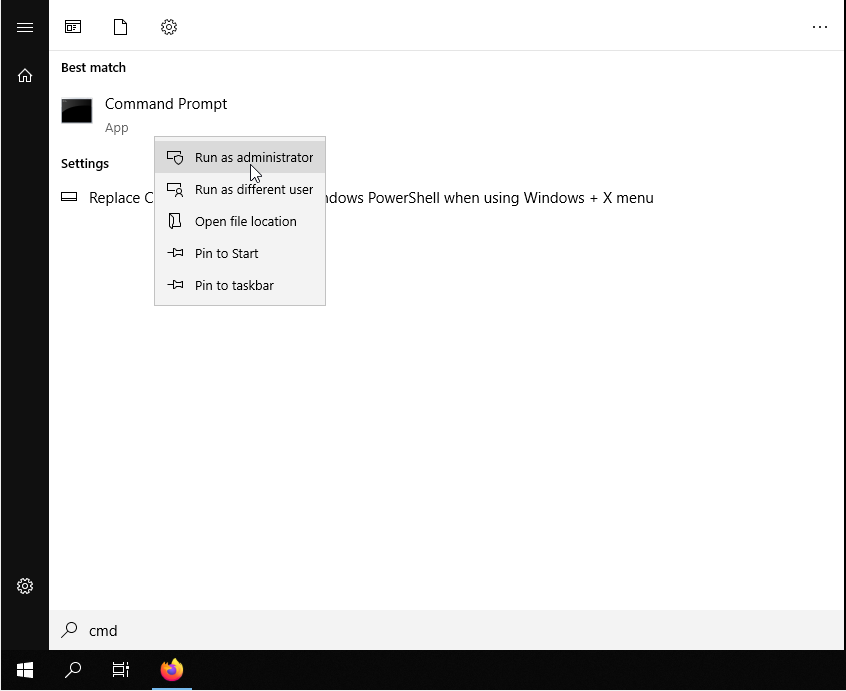
First, open your Windows Server terminal. To do this, click on Start, type "cmd" and right click on the Command Prompt icon, then select "Run as administrator".


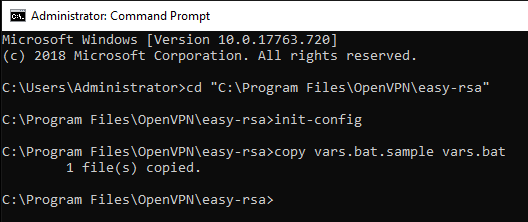
Go to the folder in which you have installed OpenVPN and run the script "init-config".
 

cd "C:\Program Files\OpenVPN\easy-rsa"
init-config

This should return an output similar to the one shown above.


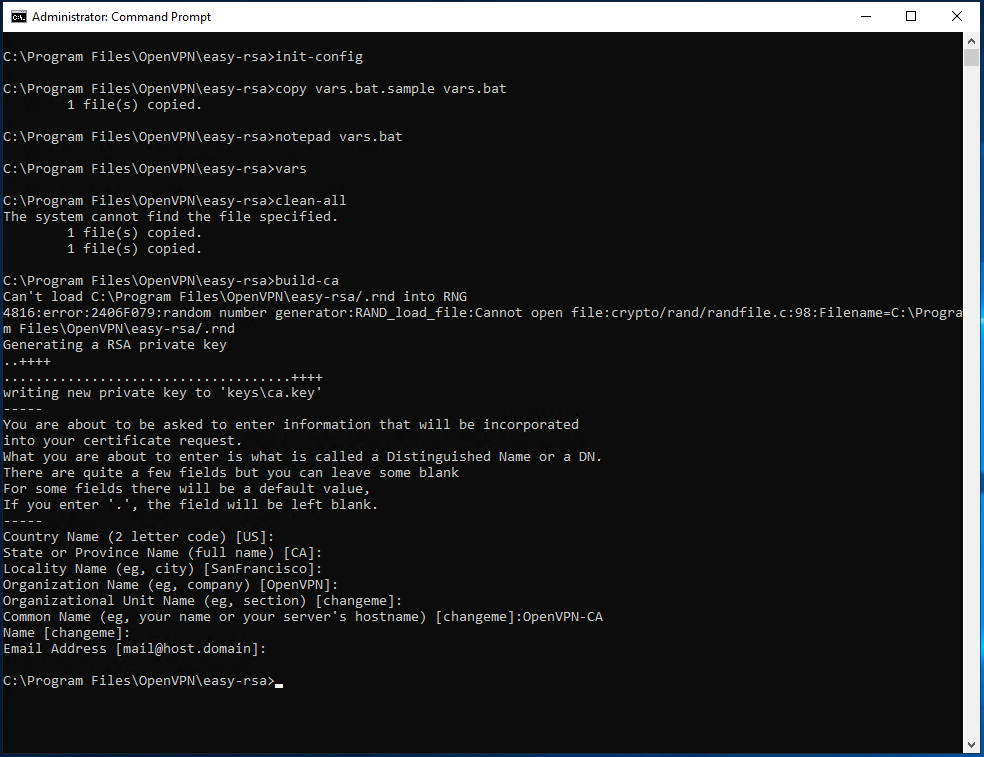
At this point, you need to make changes to the "vars.bat" file in the "C:\Program Files\OpenVPN\easy-rsa" folder:
 

notepad vars.bat

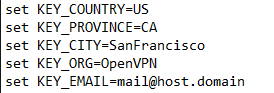
Almost at the end of the document you find a series of lines starting with "set" which are used to set some of the variable environment data. Edit these fields with your own information to generate the certificate.


This step is not vital as you will be required to enter this information later but, by setting these values here in this file, you will ensure that they are used as default parameters in future.

Once you have entered this information, save the file and close the text editor. Type the following command to implement the changes made:
 

vars
clean-all

Next, start creating the Certificate. From terminal (run as administrator, still in the "C:\Program Files\OpenVPN\easy-rsa" folder) type:
 

build-ca

If you have already edited the "vars" file with your details, these will appear in the square brackets of each required field. In this case, simply press "Send" to set these values as default parameters.

In the "Common name" field, however, you must assign an easy to remember name: in this case "OpenVPN-CA"will be used.

When the successful generation of the certificate has been confirmed, the "ca.crt" and "ca.key" files will be created in the "easy-rsa\keys" folder.


At this stage, keys must be created for the server, which can be started using the command:
 

build-key-server server_name

In this case, in the "Common Name" field, you must specify a generic name for the server. As you can see below, in our case the name "server" has been used.


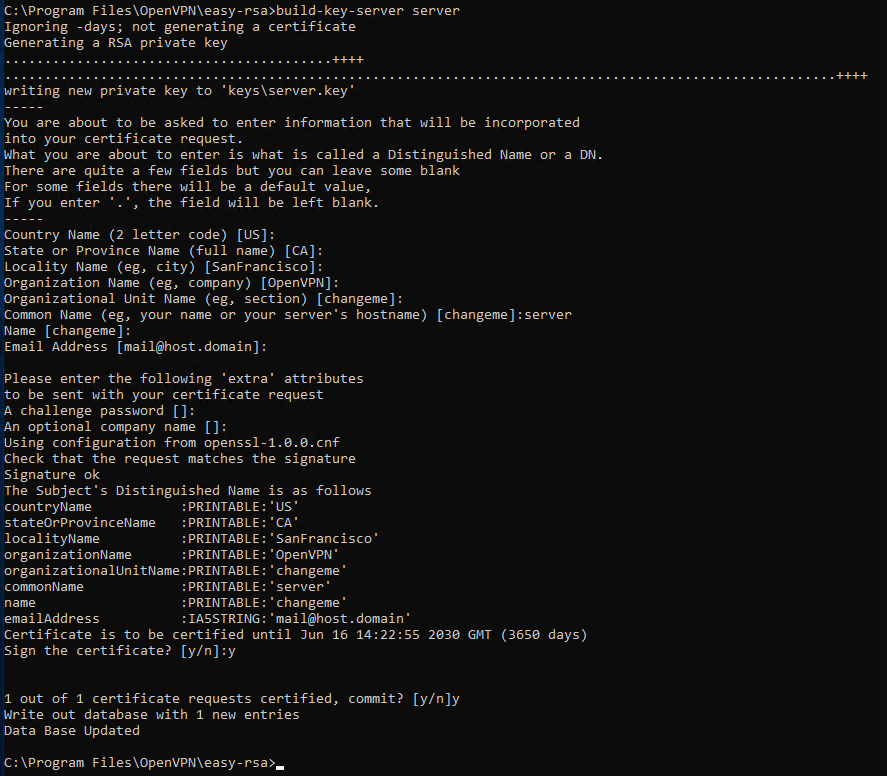
Towards the end of the procedure you will be asked twice to confirm that the data should be saved as entered. Type y both times and press "Send".
In a VPN, all connected devices must be recognizable, so Clients need a key pair to communicate. Still in your Server, from terminal, in the "C:\Program Files\OpenVPN\easy-rsa" folder, type:
 

build-key client_name

This time, in the "Common Name" field, you must provide a generic name for the Client (as you can see below, in this case "client-desktop" has been used).

Creazione chiavi client

The Diffie-Hellman encryption protocol must now be used to enable the two sides (Server and Client) to decide on a "common" key to use as authentication key to recognize each other. Then type:
 

build-dh

This operation may take some time, depending on the hardware used by the server, and requires no further action by the user.


Finally, you need to create a "ta.key", which provides additional protection to the VPN. More specifically, a TLS authentication needs to be defined to verify that packages travelling on the network are complete. To do this type:
 

"C:\Program Files\OpenVPN\bin\openvpn.exe" --genkey --secret "C:\Program Files\OpenVPN\easy-rsa\keys\ta.key"

OpenVPN already provides sample configuration files to use when generating the configuration required for the VPN to function properly.

Open Start -> All Programs -> OpenVPN -> OpenVPN Sample Configuration Files and copy the "server.ovpn" file to the "C:\Program Files\OpenVPN\easy-rsa\keys" folder. Once copied, open it using Notepad:
 

notepad "C:\Program Files\OpenVPN\easy-rsa\keys\server.ovpn"

Then select the entries:
  • ca ca.crt
  • cert server.crt
  • key server.key
  • dh dh2048.pem
and replace them with:
  • ca "C:\\Program Files\\OpenVPN\\config\\ca.crt"
  • cert "C:\\Program Files\\OpenVPN\\config\\server.crt"
  • key "C:\\Program Files\\OpenVPN\\config\\server.key"
  • dh "C:\\Program Files\\OpenVPN\\config\\dh2048.pem"
Once these changes have been made, save and close the file.
The changes that need to be made to the Client configuration file are similar to those made for the Server.

Open Start -> All Programs -> OpenVPN -> OpenVPN Sample Configuration Files and copy the "client.ovpn" file to the ""C:\Program Files\OpenVPN\easy-rsa\keys" folder. Once copied, rename it with the same "Common Name" used when generating the key (in this case "client-desktop") and open it using Notepad.
 

notepad "C:\Program Files\OpenVPN\easy-rsa\keys\client-desktop.ovpn"

Select the entries:
  • ca ca.crt
  • cert server.crt
  • key server.key
and replace them with:
  • ca "C:\\Program Files\\OpenVPN\\config\\ca.crt"
  • cert "C:\\Program Files\\OpenVPN\\config\\client-desktop.crt"
  • key "C:\\Program Files\\OpenVPN\\config\\client-desktop.key"
Then highlight remote my-server-1 1194 and replace "my-server-1" with your Server’s IP address. Once these changes have been made, save and close the file.

Next, you need to copy the following files:
  • ca.crt
  • ta.key
  • dh2048.pem
  • server.crt
  • server.key
  • server.ovpn
to the "C:\Program Files\OpenVPN\config"folder, which can be done directly by using the robocopy tool.
 

robocopy "C:\Program Files\OpenVPN\easy-rsa\keys\ " "C:\Program Files\OpenVPN\config\ " ca.crt ta.key dh2048.pem server.crt server.key server.ovpn

Now, you just need to copy these files:
  • ca.crt
  • ta.key
  • client-desktop.crt
  • client-desktop.key
  • client-desktop.ovpn
to your Client in the "C:\Program Files\OpenVPN\config\" folder.

N.B. You also need to have installed the OpenVPN GUI on the Client, as explained at the start of the Server guide.

Now, on both the Server and the Client, click on Start -> All Programs -> OpenVPN -> OpenVPN GUI.

The OpenVPN graphic interface will open in the tray system, on the bottom right. Right click on the OpenVPN icon, then click on "Connect".

When the icon turns green, it means that the connection to the virtual private network has been established correctly and therefore that the two devices, client and server, will be communicating through the VPN you have just created.