To configure the network in your Windows Cloud Server, the network adapter connected to the
Virtual Switch must have its own private IP. To do this on a Windows operating systems you need to
connect to the Cloud Server in RDP or
via the Recovery Console. Once you have accessed the machine proceed as follows:
- Go to Start > Control Panel > Network and Internet > Network and Sharing Center then click on the menu on the left "Change adapter settings".
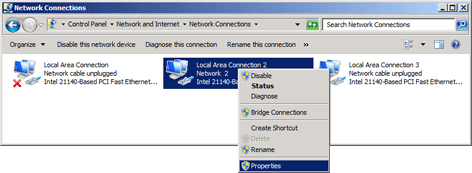
- A screen will open with a list of active network cards: once you have identified the network card connected to the Virtual Switch and right clicked with the mouse over the icon, select "Properties" from the drop-down menu (fig.1).
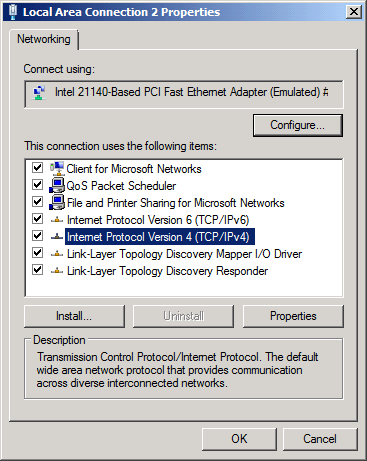
- In the tab that opens, select "Internet Protocol Version 4 (TCP/IPv4)" and then click on the button "Properties" (fig.2).
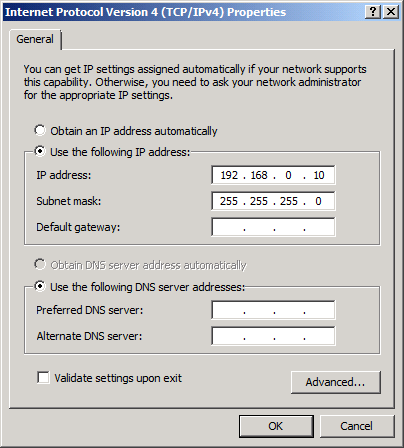
- In the "General" tab select the "Use the following IP address" option.
- Enter the private IP address that you wish to use for such card (e.g.: 192.168.0.10) in the "IP address" field.
- In the field "Subnet mask" enter 255.255.255.0 and confirm by clicking the "OK" button (fig.3)
 [fig.1]
 [fig.2]
 [fig.3]
Repeat the operation described above for all the Cloud Servers included in the private network that you are configuring. We remind you that the IP selected for each Cloud Server of your network must be unique, otherwise a clash of IP’s could be generated which prevents the communication between the Cloud Servers via the private network.